I love to do my bindings on the bias. Especially stripes. It's like a candy cane wrapping around the edge of my quilt. So cute! Yes, it does take a little more fabric, but not much.
Here is an easy trick for cutting your fabric [FAST] on the bias. You just have to figure out how to fold the fabric and then the cutting part is easy.
 First, lay down your fabric at an angle with the right side of the fabric facing DOWN. Take the bottom corner and fold it up so that its right edge is parallel with the right edge of the main fabric.
 Next, take the left corner of the fabric and fold it over so that it makes a "right angle" on the left side of the first fold.
 Then cut your strips the desired widths you like. The strips will come out varying lengths. Use as many strips as you think you'll need. I usually pick out the longest strips and discard the ones that are really short.
Cut off the angled ends.
Connect the strips: lay two strips on top of each other {with right sides together} so that they're ends are perpendicular to each other. Draw a line from corner to corner and pin in place. Stitch on this line and then trim 1/4" away.
Iron in half lengthwise with wrong sides together.
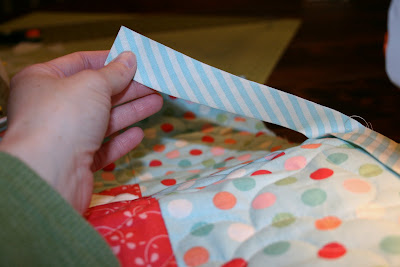
 In the middle of one side of your quilt, begin sewing the binding to the front of your quilt, lining up the raw edges. Leave about 5 inches unsewn at the beginning. Using 1/4" seam allowance, sew along the edge until you reach the first corner.
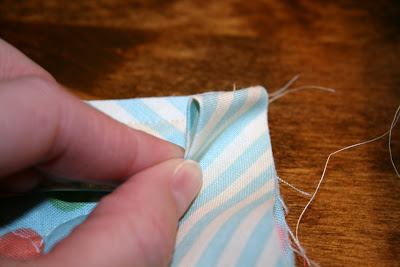
To miter corners: sew up to 1/4" away from the first corner. Stitch in place a few times and then cut the threads. Rotate your quilt, getting ready to sew the binding on to the next side.
 Flap it back and forth. Adjust it, if necessary, to make sure that its edges line up with the raw edges of the quilt in that corner, no matter which way it lays.
  Before sewing again make sure that the flap fold is lined up with the top edge of the quilt {the edge that already has binding sewn on} like you see in this picture.
  Position the needle 1/4" away from the corner. Stitch in place a few times and then sew down the entire length of that side of the quilt. Repeat the mitered corner process in each corner.
 When you get back to the side you started on, stop sewing about 8 inches from where you began. Flip up the end of the binding so that it is perpendicular to that side of the quilt.
 Bring the unsewn binding from the beginning across that ending piece of binding that you just flipped up.
 Keep the strips taut. If they're too loose, you'll have too much fabric there~ resulting in tucks in your binding. Pin the two pieces of binding together and sew on the diagonal.
 Line up the binding along that side of the quilt again and stitch over that part with a 1/4" seam allowance.
You're almost done. The last thing you'll want to do is put on one of your favorite movies (one that you know by ♥ is best so that you don't have to look up very much) and begin hand stitching it down on the back side of your quilt. Here are a few more great tips on that.
Now you're done. Grab a little cutie {like Miss M} and have some snuggle time together with your finished quilt! After all, that's what they're really for, right?


I sew my binding on the same way you featured here. It's a great method. I'm going to try your way of cutting fabric too. It looks really interesting and fast.
ReplyDeleteI'm gonna have to save this; the cutting was new to me--thank you for sharing that! I've always stayed away from stripes on a binding. Way too intimidating. Not anymore! Also, I've never finished off my binding nicely; it always feels bulky. It won't anymore, thanks to your tip!! :)
ReplyDeleteThanks for making the folding and cutting part so clear! I've made bias binding before and can never figure out how to cut the strips with the fabric folded. This will make it so much easier!
ReplyDeleteThanks Amber great tutorial and such a cute quilt model!
ReplyDeleteThank you so much for the tutorial, I've been wondering how to do it. I have a quilt to bind and will give it a try. Have a great day!
ReplyDeleteWhat a cutie! Thanks for the great tutorial!
ReplyDeleteThis is the best binding tutorial I have ever come across. Thanks for sharing! This one is going in the files.
ReplyDelete:)Rachel
I love striped binding too! Your quilt is so cute and it looks perfect for snuggling under :D!
ReplyDeleteGreat tutorial Amber. I always do bias binding and stripped is my favorite too. Your pictures were very clear.
ReplyDeleteCute quilt and even cuter cutie snuggled under it.
Still looking forward to seeing the red and blue quilt.
Cute and good tute.
ReplyDeleteTHank you for the tutorial, I have never seen the fabric cut that way. I will have to try it!
ReplyDeleteSheilaC
Thanks for the tutorial. I have folded mine twice to cut it but not three times.
ReplyDeleteJust saw your post on Moda Bake Shop. Very cute quilt! They messed up your link. You may want to ask to have it fixed.
ReplyDeleteAhhh Amber, you are certainly the right amount of spice sprinkled on all of our lives...Your tut at Moda was heartfelt...Keep us inspired..
ReplyDeleteblessings madame samm
That's how I do it too. So easy and fun to do. Hey, I just read the comment above me. I'll have to run over and see your Moda Bakeshop project. Congrats!
ReplyDeleteWhat a CUTE quilt!!! I LOVE the colors. Loved your Moda Bakeshop quilt too!
ReplyDeleteThat looks so much easier than the way I've been trying to do it. Your pictures explain it very well!
ReplyDeleteWhen I saw all of that folding and cutting I cringed. How scary, but you are a genius. Beautiful quilt and little girl. Great tutorial.
ReplyDeleteI have always wanted to make my own bias tape, but was afraid it would waste so much fabric... Do you find that to be true?
ReplyDeleteI LOVE the way you join the ends together. This is my least favorite part of binging, and it worked perfectly!! Thank you for the tut!!
ReplyDeletethank you for the tutorial. I have striped fabric for binding a baby quilt I am doing. I was really nervous about how to cut to give the look of yours.
ReplyDeleteThank you for a great tutorial. I will try your method next time I do binding. I love the ending bit too. It looks so much easier than the method I've been doing, thanks :) Love the finished quilt too :)
ReplyDeleteWhat a great tutorial. I lean from seeing it so the pics are terrific. Going to go and try this method.... So much simpiliar then making that crazy tube of fabric and then cutting it with scissors. Thank you
ReplyDeleteWell I missed something, I cut off the folds. Yeah all if them. That's right, if there is a way to go wrong, I will. LoL I got it done in spite of myself. Thanks, this is a fantastic tutorial. I will use it alot.
ReplyDeleteIf there is a way to make a mistake, I will do it. I cut all the folds LOL, I can laugh now . In the end It looks great. Your pics and tutorial are wonderful.
ReplyDeleteGreat tutorial. Very easy to follow and understand.
ReplyDeleteYour tutorial was awesome! I was always afraid to try biased binding, but you made it so simple and it made so much sense! My binding strips turned out perfectly <3
ReplyDeleteThank you! Thank you! So much easier than any other way I've tried.
ReplyDeleteI tried cutting a bias binding once, and it was the biggest fiasco ever! It was stripes and I even went to my local quilt shop to have the "professionals" show me how to cut it. They didn't know how to cut it and ended up having to give me more fabric! Anyway, lucky for me I found your blog and your excellent tutorial! It was very easy to follow and I just finished cutting out perfect striped binding! Thank you!
ReplyDeleteOh that makes me so happy to hear! Glad I could help and thank you for taking the time to leave me that message!
DeleteHave a great day!
Ambet